Kaspersky Rescue Disk is a good option to fix infected computer which is not booting at all or giving problems after starting up like no internet connection or unable to execute security softwares. It is from one of the most recommended security vendor so if you are not using the internet security from them, can use this on demand scanner disk from the developer to remove virus from your computer.
You can get the rescue cd from the link below. This is the direct download link, if it doesn't work then go to the end of the post to visit the homepage
Click Here To Download Rescue Disk
Now go to the BIOS of your computer by pressing delete or F1 key in most cases else you need to check the computer manual or main screen when your computer starts and make first boot priority CD/DVD there, save the settings by pressing F10 key and restart your computer till you see the screen as shown below press any key to continue
Now select the desired language and press enter
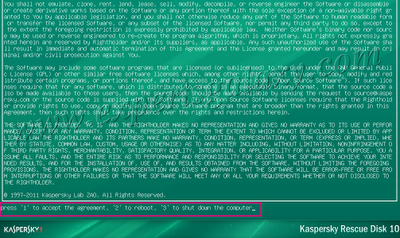
On the next screen you will see the end user license agreement on the next screen, scroll down till end and press 1 to accept it as shown below. Earlier it was 'a' to accept so carefully see whatever options are displayed on the screen.
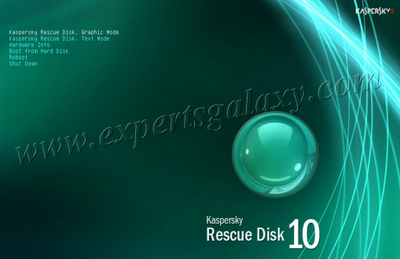
Now from the available options select the first one which is graphic mode as shown below.
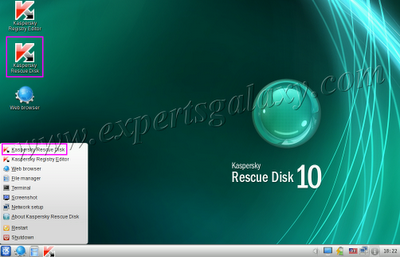
Now you will see the desktop screen, click on the rescue disk icon as shown below or you can open the same from the start menu. This new version of rescue disk also contains the registry editor for advance users.
Check all the options listed in the new window and then click on my update center as shown below
Now click on the start update button and wait till the red button turns green, in the waiting time lets do few more settings
Click the settings icon as highlighted in the image above and you can see we have three options to perform on threat detection, select either of them as per your requirement, I have been selecting the last option as selected below for a very long time and then click on settings button on the screen.
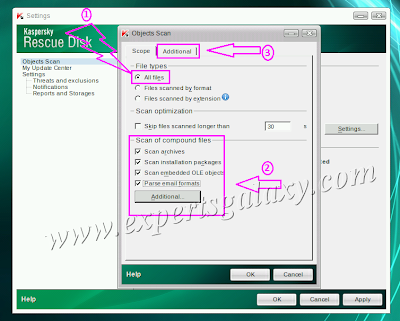
Here first adjust the scan settings and make sure all files including the options under compound files should be checked as shown below then click on additional settings.
Make sure both the options should be checked here and you can also set the type of scan from light to medium or deep as shown, click ok and it will take you back to the security settings screen, just click on apply, ok and start the scan.
Scan will take time depending upon the data on your hard drive, after that your computer will be clean and able to boot. If you are using this disk on a computer which is not connected to internet you can create an updated rescue cd using the already installed Kaspersky on another computer.


