If you do not want to create multiple discs for the same or don`t want to use any tool to create a single disk with all your rescue disks from different security developers ( Its recommended to create a single disk or USB with all your troubleshooting utilities rest all depends upon the case ), you may use a tool to create bootable USB drive for the same that can be reused later. Lets see how we can do that by creating a bootable USB drive for Bitdefender rescue disk.
To create a bootable USB drive, you need to have the ISO image of the rescue disk. You can download the same for Bitdefender from the below link :-
Click Here To Download Bitdefender Rescue Disk ISO Image
Now we need a software that can help us in making a bootable USB drive for the downloaded ISO. We can use UNETbootin for the same that can be downloaded from SourceForge using the below link
http://unetbootin.sourceforge.net/
It is available for Windows, Linux, Mac OS X and supports many Linux distributions also known as distros ( rescue disks are in Linux format ) and other utilities. You can see the full list of supported distros on their site. If your distro is not there in the supported list, still you can try the software to make a bootable USB incase there is no official USB maker from the developer of your favorite distro. Like UNETbootin supports the creation of Kaspersky rescue disk in USB format even if there is already an official software available for the same from the developer.
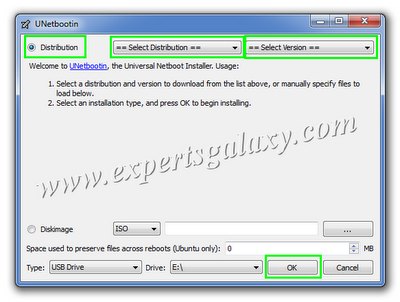
Once you have downloaded the ISO image of the distro for which you want to create the bootable USB drive and the UNetbootin software to do the same, simply run it. If you do not have the ISO image the software also gives you an option to download the same by selecting the distribution and version for it as shown below. Once you click on ok, it starts creating the selected drive as bootable USB after downloading the selected ISO image.
If you already have the ISO image of your favorite distribution, then select the second option in the software, locate the image in your hard drive, select the USB drive and then click ok. If your drive is not showing there, first of all make sure that you have taken the back up of your data in the drive as you need to format the drive in FAT32 file system. If the drive is already in the supported file system then your data will be intact but still take the backup of the data.
Once you click on ok, it will start creating the bootable USB as shown below
It will install the syslinux boot loader to the USB drive as shown below.
Once the process will be complete, simply click on reboot as shown below and then go to your BIOS settings by pressing F1, F2, Escape or Delete key ( You may need to refer the computer manual or simply see the computer screen as mostly it shows a message like press Delete to enter setup or BIOS ). You need to make first boot device there as USB or removable media and then save the settings by pressing F10 function key.
If you are not familiar with the rescue disk, here is a step-by-step tutorial on how to use Bitdefender Rescue Disk. If the computer can be started in normal mode or safe mode then you can also follow our step-by-step guide to remove infections.


